Contents
November 2009 Kits
December 2009 Sneak Peeks
November Guest Designers
Tips for November Kits
Thanksgiving Quotes & Titles
Fast & Easy Christmas Tags
Giving things a little dimension
SCRaPDANGo Sketches
November Sugar and Spice Kits
Sugar Kit
Cosmo Cricket - Nutmeg

12x12 Patterned Double-sided Scrapbook Paper
o 1 sheet Maple
o 1 sheet Acorn
o 1 sheet Falling Down
o 1 sheet Clove
o 2 sheets Cinnamon
o 2 sheets Autumn
o 1 sheet Nutmeg Elements
12x12 Cardstock Scrapbook Paper
o 1 sheet Arizona
o 2 sheets Dragonfly
o 1 sheet Lizard
o 2 sheets Burning Ember
Embellishments
o 1 package American Crafts Rocketeer Chipboard Thickers in Chocolate
o 1 package Prima Pearls and Crystals in Olive
o 1 package Prima Mini Stamp Set - Owl
o 3 Prima Fun Felt Venti Daisies
o 1 Prima Embroidered "Family" Canvas Tab
o 3 American Crafts Flair Adhesive Badges in Miss You and Relax
Spice Kit
Bella Blvd - Super Stud

12x12 Patterned Double-sided Scrapbook Paper
o 1 sheet Robot Love
o 1 sheet Eclipse
o 1 sheet Cosmic Energy
o 2 sheets Cyber Kisses
o 2 sheets Planetarium
o 1 sheet Bits A Bella
12x12 Bazzill Cardstock Scrapbook Paper
o 2 sheets Desert Sun
o 2 sheets Spring Breeze
o 2 sheets Atlantic
Embellishments
o 1 package American Crafts Tinsel/Foil Thickers in Cricket
o 1 package Prima Say It in Studs embellishment pieces
o 1/2 package Prima Pebbles in Digitized
o 3 Fancy Pants Rough and Tough Pins
o Approximately 8 American Crafts Glitter Brads in Primary
o Approximately 6 American Crafts Glitter Brads in Earth Tones
o 1 yard Prima Ribbon (styles and colors vary)
December sneak peeks
Take a look at next months Sugar & Spice Kits for December 2009!
You’ll want to add these to your stash. Watch for the Big Reveal…….on December 15th 2009! These kits will begin shipping December 25th!
December Sugar Kit Sneak Peek

November Spice Sneak Peek

November Guest Designers
Kelly aka kcflorida

My name is Kelly and I'm so excited to be chosen as a guest designer for Scrapdango. I'm looking forward to working with everyone. All of the work that is produced on this board is such an inspiration! I spent several years teaching 5th grade,
but am now a SAHM in sunny Florida!!
I have been married to my wonderful husband (Jason) for 6 years now. We have 2 children who keep my very busy; Jacob(3) and Allyson(1).
I began scrapping about 10 years ago by accident for a school ‘how to speech’ project. It took off from there.
But, it wasn't until I had my son that I became a serious scrapper. It now consumes all my free time. I love capturing and preserving every moment in my kids lives. Hopefully, one day they will look back and treasure these pages!
http://www.jandkconner.blogspot.com/
Tips for November Kits
Sugar Ideas
1. The strips on the Falling Down paper is lined just like primary writing paper and makes really fun journaling strips!
2. I love using the American Crafts Flair badges as a fun alternative to buttons or brads for flower centers! They work perfectly with the big Prima Venti Daisies in this kit!
3. When you don't have a sewing machine (or it stops cooperating like mine did mid LO!) use a white pen to connect your holes to create "faux" stitches!
4. If you're looking for something to add to your flower petals, use other shapes you may have on hand. I used a scalloped circle punch and cut slits in it to make another flower to layer.
Spice Ideas
1. You can change the color of the chipboard alphas in the kit by ripping off the top layer and then inking or painting or add stickles or glimmer mist to it.
2. Don't throw away negative images. I used the cricut to cut a star out of cardstock and then used the negative image on a card and backed it with one of the coordinating papers.
3. Use your gel pens to doodle patterns onto your thickers to create a different look.
4. The pins are great elements to add to a ribbon knot.
Thanksgiving Quotes & Titles
By Lisa
Thanksgiving Is Not A Time Of The Year, But An Attitude Of The Heart
~ Unkown
"An optimist is a person who starts a new diet on Thanksgiving Day."
~ Irv Kupcinet
"As we express our gratitude, we must never forget that the highest appreciation is not to utter words, but to live by them."
~ John Fitzgerald Kennedy
"Forever on Thanksgiving Day, The heart will find the pathway home." ~ Wilbur D. Nesbit
"Gratitude is a quality similar to electricity: it must be produced and discharged and used up in order to exist at all."
~ William Faulkner
"Gratitude is not only the greatest of virtues, but the parent of all the others." ~ Cicero
"He who thanks but with the lips, Thanks but in part; The full, the true Thanksgiving, Comes from the heart." ~ J.A. Shedd
"If the only prayer you said in your whole life was, "thank you," that would suffice." ~ Meister Eckhart
"Not what we say about our blessings, but how we use them, is the true measure of our thanksgiving." ~ W.T. Purkiser
"Real abundance is found when we join hands with those we love."~ Anonymous
"Thanksgiving Day comes, by statute, once a year; to the honest man it comes as frequently as the heart of gratitude will allow." ~ Edward Sandford Martin
"Thanksgiving is possible only for those who take time to remember; no one can give thanks who has a short memory."
~ Anonymous
"To speak gratitude is courteous and pleasant, to enact gratitude is generous and noble, but to live gratitude is to touch Heaven." ~ Johannes A. Gaertner
"When asked if my cup is half-full or half-empty my only response is that I am thankful I have a cup."
~ Sam Lefkowitz
A Bountiful Harvest
A Day Of Thanks
A Happy Heart Is A Thankful Heart
A Harvest Of Memories
Carving Memories
Count Each Day As A Blessing
Family Traditions
Feast Your Eyes On This
Friends, Family, Food And FOOTBALL!
Gather Together With Thankful Hearts
Give Thanks With A Grateful Heart
Happy Harvest
Happy Turkey Day
Harvest Delight
In Everything Give Thanks
It's Turkey Time!
Let's Get Stuffed
My Little Turkey
Our Table Runneth Over!
Pies, Pies & more Pies!
Pilgrim's Pride
Pumpkin Pie
Sharing The Harvest
So Much To Be Thankful For
Thankful Hearts, Helpful Hands
Thanksgiving Traditions
The Dressing Of A Turkey
Turkey Day
Turkey, Dressing And Pumpkin Pie
Turkey Time!
What A Feast!
What We Are Thankful For
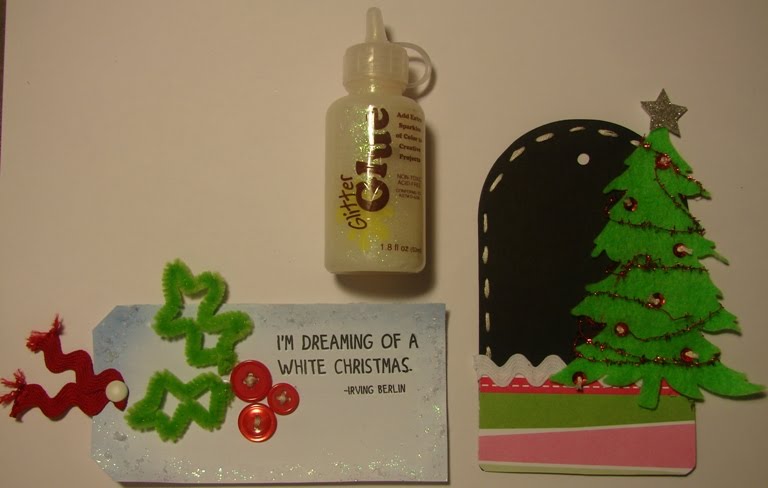
Fast and Easy Christmas Tag
By Nikki
Want to add a home-made touch to your Christmas gifts this year?
Why not make your own holiday tags!
A hand-made tag can save money and make the recipient feel special by adding a bit of your creative touch to your gift. With a few items from your personal stash, hand-made tags can be made quickly and with little effort.
First, gather your materials needed.
I chose a lot of felt because I love the texture and playful look it gives a project. With a few colored sheets that cost around 15 cents each and a Big Shot Die Cut Machine, I made several Christmas trees and hand-made flowers to adorn my tags. Green pipe cleaners make cute holly leaves when twisted to shape and you can never go wrong with buttons, ribbon and rub-ons to be used for sentiments. Christmas embellishments like jingle bells, candy canes and small die-cuts are also great additives. You really can’t go wrong with anything Christmas related in your current stash.

Using hand-made embellishments and stitching:
My hand-stitched felt flowers were perfect embellishments for these pink tags that can be used on my teen-aged daughter’s gifts. A hand-stitched border also ties in with the stitching used on the flower. Non-traditional colors for the holidays are a big trend right now and these mint green and hot pink colors are perfect for pink, white or green wrapping paper. A Christmas button will also spice up your felt flowers.

Using Ribbon:
Grab your left-over pieces of holiday ribbon and create cute tags like these. A few pieces of different lengths can create an adorable Christmas tree and top it off with a punched star using a glittery patterned paper. Add more bling by randomly placing clear bling circles for the look of lights. A brown ribbon tree base works nice and stitching is optional. Don’t shy away from non-traditional embellishments like bottle caps, staples or mesh. Nothing is wrong when using your scraps or older stash items.

Stickles, Sequins and Bling!
All that glitters is gold and Christmas is the time of the year when everything glitters. Grab your stickles or glitter glue and make your tag sparkle. On my White Christmas tag, I wanted a snowy texture along with the glittery border so I cut up white yarn to resemble snow all along the border of the tag. Red buttons, in various sizes, hand-stitched on made great berries. And with a little red ric-rac, my tag is ready for any gift.
Even black cardstock can make a great Christmas tag. Red sequins stitched with tiny knots made adorable ball ornaments on the green felt Christmas tree and a touch of sparkly red fiber made for perfect tinsel. I left this tag blank so I could hand write my own “To: & From:” on the front.
Using your Tags to make Christmas Cards:
Why not take your tags one step further and create Christmas cards with them. A larger tag can be glued on the front of your card and you’re done! Don’t want to hand-stitch or use your sewing machine? Just hand draw your stitched lines like I did in this cute Noel card. It’s much faster but it stills gives you the same great result. You can also glue your tags onto plain colored gift bags. Add a few Christmas ribbons, raffia or curling ribbon and you’ve created a beautiful bag for far less than it would cost you in the store.

Merry Christmas and Happy Tag Scrapping!
Giving things a little Dimension
by Kerryn Fry
Have you ever stood back and looked at what you are working on and felt like it lacked a little something?
Or felt your page was a little flat and needed some life added to it?
Adding dimension to your layouts can give them a whole new perspective and it is so easy to achieve.
I can honestly say there would not be many of my layouts that don’t have some sort of dimension to them.
The simple version of achieving depth in your page is to vary the products that you add to your design.
Thankfully, most companies bring out a variety of pre-made embellishments in their ranges to co-ordinate with the pages you use.
Rub-ons and stickers are thin and are generally added directly to your layout, but you can also apply them to cardstock, cut them out and use some foam to put them on your work.
Chipboard products are a perfect product, they generally vary in their thickness for easy dimension, but a simple piece of mounting foam also sees them in a new light.
You can also use felt and foam for different textures which will give your work life.
And Journal tags and die-cuts are a fabulous item to lift off of the paper.
But of all our products, I think Patterned paper would be the most flexible of all scrapbooking products.
Without any fussy cutting you can instantly create the illusion of depth simply by using a few different techniques.
Scrunching and folding come to mind, they are 2 of the easiest methods, both can achieve fabulous results.


But with a little bit more work and a good pair of scissors,
the next step is capable of taking your page to whole new world, with the ability to tell its own story.
It can be as easy as scissors, papers and some 3D tape, dots or foam sheets.
A bit of fussy cutting from patterned papers, can be all you need to create dimension and it would be one of the cheapest option to decorate your pages!
It is at this point I should add a warning,
Once you start to look at patterned papers only for what you can cut out of them,
sadly it means you have fallen fowl to this addiction.
But you will never regret it!
So where do you start??
I found the easiest patterns to start with are large flowers, circles and stars.
Usually, the paper will contain different sizes of the one shape, allowing you to create a few layers within that element.
Once you become confident when cutting things out, the possibilities are endless.
You will be able to add anything to your work, if it appears in print, then try to cut it out.
It won’t always go to plan, but you will be amazed what parts you can use.


Remember it doesn’t just have to be the shapes that appear on the paper.
The smaller patterns can be used with any punches, stencils or you can draw your own shapes and cut them out.
Stars, arrows, corners and brackets would be my favorite.
But any templates or chipboard shapes you have on hand can be used.
So there you have it, any product on your page can be lifted to create layers.
Mounting foam is the easiest way to add depth, but I also keep scrap cardboard on hand in different thickness as a second option.
I found with the amount of 3D work I do, double sided tape and cardboard is definitely a great cost effective way to mount items.
I like to use it for larger items on my layouts like photos and journal tags, it helps on the recycling front as well.
Multiple photo pages really do come to life when some of the photos are mounted onto cardboard.
So keep any of your clean cardboard packaging in a safe place, it will always come in handy.

Well I hope this article gives you plenty of ideas when starting to create your next page,
a little bit of mounting foam can go such a long way when it comes to creating a masterpiece.
The great thing is, you can achieve it easily without buying all of the fancy embellishments that are released.
Either way, the difference a bit of depth and dimension will make to your layouts, will speak for itself.
So sharpen up your scissors, gather your embellishments, make sure you view your papers in a different light and begin the journey.
Happy Scrapping!
SCRaPDANGo Sketches

Sketch designed by Lynn

‘A very busy summer’ by Carly

Sketch designed by Kerryn

‘Hold me close’ by Kerryn
__________________


No comments:
Post a Comment